Portfolio
A description of building this portfolio.
Introduction
So, I decided to redo my portfolio. I made the decision to go with GitHub Pages, Jekyll, with the Al-folio. I had some growing pains getting everything set-up, probably because I could not be bothered to read the documentation.
Why this matters: Building a professional portfolio site from scratch demonstrates infrastructure skills, troubleshooting ability, and commitment to self-presentation in the security community.
So, I put this together to document my process of putting it together. And, maybe it can help someone else who is struggling to get it set-up.
Link
Process
Setup
The first step of the process is finding a Jekyll them that meets your purposes. Unfortunately, I cannot help you with that. It is a matter of personal preference. I went with the Al-folio theme. If you go with a different theme, this guide might be of limited value. I don’t have experience with any other themes.
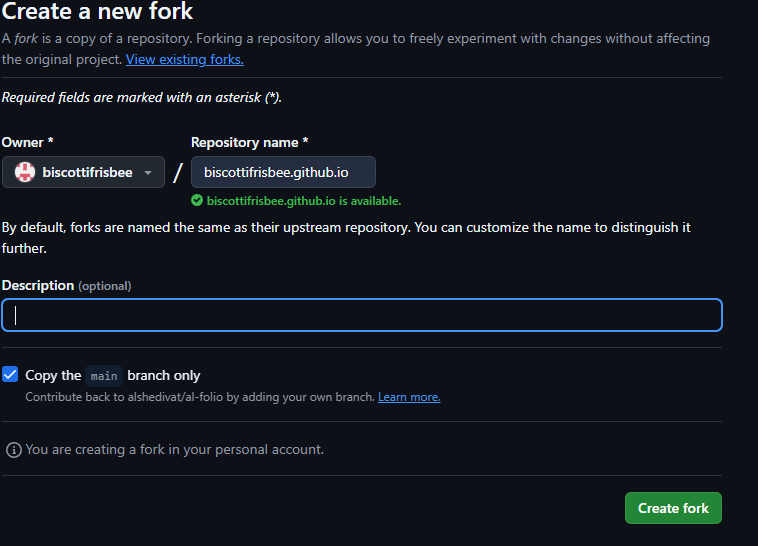
Navigate to the al-folio repository and click Fork.

For the repository, the name has to be in a specific format. It has to follow a specific naming convention for GitHub pages. That is your_user_name.github.io.
<your_user_name>.github.io

Ex.
biscottidiskette.github.io
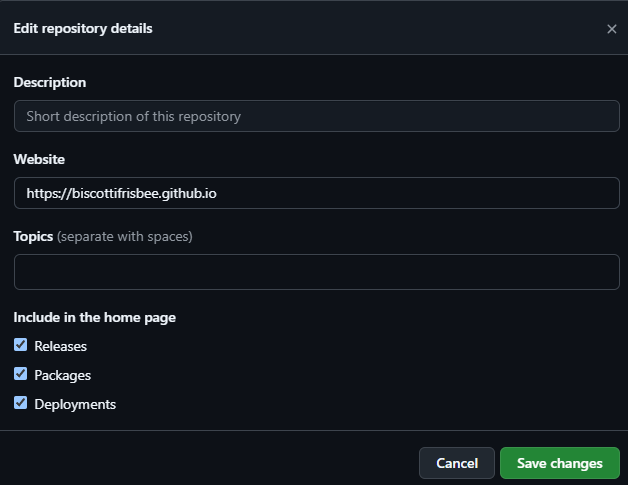
Click on the COG wheel in the about section.

Update the URL and the description.
Now, install the prerequisites, the ruby manager, the ruby build environment. This install setup is from StackOverflow.
cd $HOME
sudo apt update
sudo apt install git-core curl zlib1g-dev build-essential libssl-dev libreadline-dev libyaml-dev libxml2-dev libxslt1-dev libcurl4-openssl-dev libffi-dev

git clone https://github.com/rbenv/rbenv.git ~/.rbenv
echo 'export PATH="$HOME/.rbenv/bin:$PATH"' >> ~/.bashrc
echo 'eval "$(rbenv init -)"' >> ~/.bashrc
exec $SHELL

git clone https://github.com/rbenv/ruby-build.git ~/.rbenv/plugins/ruby-build
echo 'export PATH="$HOME/.rbenv/plugins/ruby-build/bin:$PATH"' >> ~/.bashrc
exec $SHELL
Use the rbenv to get the most recent version of ruby. Note the version.
ubz@ubz-VirtualBox:~/Documents/GitHub/biscottidiskette.github.io$ rbenv install -l
3.1.6
3.2.6
3.3.6
3.4.1
jruby-9.4.9.0
mruby-3.3.0
picoruby-3.0.0
truffleruby-24.1.1
truffleruby+graalvm-24.1.1

Only latest stable releases for each Ruby implementation are shown.
Use `rbenv install --list-all' to show all local versions.
Install the later version of ruby. Please note, this is building from source so it will take a bit. Set that version of ruby. Check the verions of Ruby to ensure that the install completed successfully.
rbenv install 3.4.1
rbenv global 3.4.1
ruby -v
Use Ruby’s gem to install bundler.
gem install bundler
rbenv rehash
Install Code or your favourite programming envrionment.
sudo snap install --classic code
From the Code Dropdown, copy the git https link.
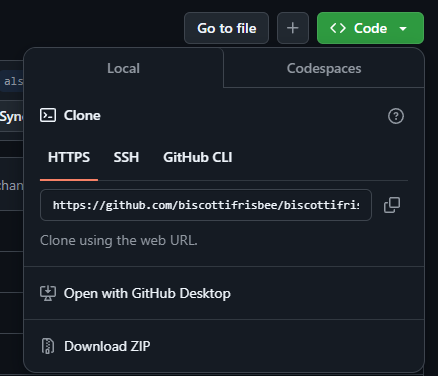
Clone the repository to your development machine.
ubz@ubz-VirtualBox:~$ git clone https://github.com/biscottidiskette/biscottidiskette.github.io.git
Open the code folder structure in Code.
ubz@ubz-VirtualBox:~$ code .
Change directory in the folder and execute bundle to install the prerequisites.
cd biscottidiskette.github.io/
bundle
Use bundle to spin up a local webserver. You can get the ip and port at the bottom of the output and this can be viewed in the web browser. Please note that this bundle command can be used whenever you want to test and see changes that were made. Use Control + C to stop the server.
ubz@ubz-VirtualBox:~/Documents/GitHub/biscottidiskette.github.io$ bundle exec jekyll serve

<snip>

Server address: http://127.0.0.1:4000
  Server running... press ctrl-c to stop.
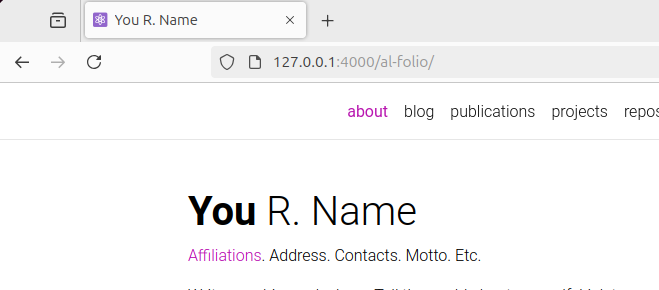
Make some simple changes just to test if everything is working correctly. These changes will take place in the _config.yml file and the _pages/about.md.


Reviewing the output from the server start, notice the imagemagick error message.

Update the imagemagick enabled property to false.

Also in the _config.yml, update the first_name, last_name, url, and base_url.


Make test changes to the about.md file so we can ensure that everything is working correctly.
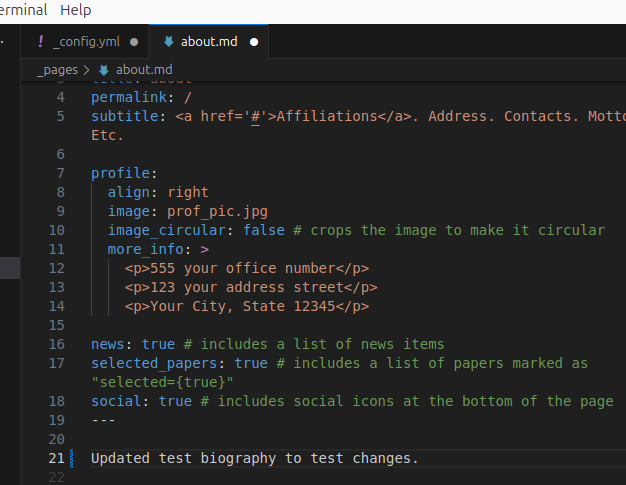
Save all of the changes that were made. Rerun the server and check the change like in the steps above.

Create Collection
Create a md file in the _pages folder. Create a folder under the root folder with the same name as the pages file preceeded by an underscore.


Update the header of the new page that was just created.
---
layout: page
title: boxes
permalink: /boxes/
description: All of the boxes, CTFs, and various other practice.
nav: true
nav_order: 2
display_categories: [HackTheBox, TryHackMe, VulnHub, CTFs]
horizontal: false
---
- layout: Indicates the layout of the file. Collections use page layout.
- title: The tile for the collection.
- permalink: The url for the new collection.
- description: The description that will appear under the header.
- nav: Will it appear in the site header.
- nav_order: The order that the heading will appear in the site header.
- display_categories: The different categories for the collection.
- horizontal: Allows for horizontal orientation.
Update the file to display to display_categories to the site.
<!-- pages/boxes.md -->
<div class="projects">
    {% if site.enable_project_categories and page.display_categories %}
        <!-- Display categorized boxes -->
        {% for category in page.display_categories %}
            <a id="{{ category }}" href=".#{{ category }}">
                <h2 class="category">{{ category }}</h2>
            </a>
        {% endfor %}
    {% else %}


    {% endif %}
</div>
Review the updates to ensure that everything is correct so far.

Create a test item for the new collection.

---
layout: page
title: Brainpan
description: Brainpan buffer overflow from TryHackMe.
img:
importance: 2
category: TryHackMe
related_publications: false
---
- layout: Indicates the layout of the file. Collection Items use page layout.
- title: The tile for the item.
- description: The description that will appear under the header.
- img: The image that will be displayed on the collection card on the collections page.
- importance: The sort importance of individual item.
- category: The category of the item for grouping purposes.
When the bundle exec command is run, it will pull all of the items for the _collection folder and add them to the _site folder. So, create a variable the fetches all of the items from the site object, filtering by category. The create a second variable that sorts the first variable in order of importance.
<!-- pages/boxes.md -->
<div class="projects">
    {% if site.enable_project_categories and page.display_categories %}
        <!-- Display categorized boxes -->
        {% for category in page.display_categories %}
            <a id="{{ category }}" href=".#{{ category }}">
                <h2 class="category">{{ category }}</h2>
            </a>
            {% assign categorized_boxes = site.boxes | where: "category", category %}
            {% assign sorted_boxes = categorized_boxes | sort: "importance" %}
            <!-- Generate cards for each boxes -->

        {% endfor %}
    {% else %}


    {% endif %}
</div>
Create a new liquid file in the _include folder. Update all of the variables to what the individual item variable will be called.
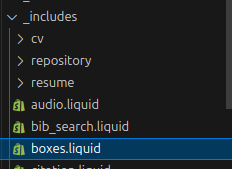
<div class="col">
  <a href="{% if box.redirect %}{{ box.redirect }}{% else %}{{ box.url | relative_url }}{% endif %}">
    <div class="card h-100 hoverable">
      {% if box.img %}
        {%
          include figure.liquid
          loading="eager"
          path=box.img
          sizes = "250px"
          alt="box thumbnail"
          class="card-img-top"
        %}
      {% endif %}
      <div class="card-body">
        <h2 class="card-title">{{ box.title }}</h2>
        <p class="card-text">{{ box.description }}</p>
        <div class="row ml-1 mr-1 p-0">
          {% if box.github %}
            <div class="github-icon">
              <div class="icon" data-toggle="tooltip" title="Code Repository">
                <a href="{{ box.github }}"><i class="fa-brands fa-github gh-icon"></i></a>
              </div>
              {% if box.github_stars %}
                <span class="stars" data-toggle="tooltip" title="GitHub Stars">
                  <i class="fa-solid fa-star"></i>
                  <span id="{{ box.github_stars }}-stars"></span>
                </span>
              {% endif %}
            </div>
          {% endif %}
        </div>
      </div>
    </div>
  </a>
</div>
Create a new liquid file in the _include folder for the horizontal orientation. Update all of the variables to what the individual item variable will be called.
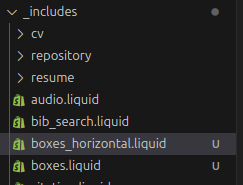
<div class="col mb-4">
  <a href="{% if box.redirect %}{{ box.redirect }}{% else %}{{ box.url | relative_url }}{% endif %}">
    <div class="card h-100 hoverable">
      <div class="row no-gutters">
        {% if box.img %}
          <div class="col-md-6">
            {% include figure.liquid loading="eager" path=box.img sizes="(min-width: 768px) 156px, 50vw" alt="box thumbnail" class="card-img" %}
          </div>
        {% endif %}
        <div class="{% if box.img %}col-md-6{% else %}col-md-12{% endif %}">
          <div class="card-body">
            <h3 class="card-title">{{ box.title }}</h3>
            <p class="card-text">{{ box.description }}</p>
            <div class="row ml-1 mr-1 p-0">
              {% if box.github %}
                <div class="github-icon">
                  <div class="icon" data-toggle="tooltip" title="Code Repository">
                    <a href="{{ box.github }}"><i class="fa-brands fa-github gh-icon"></i></a>
                  </div>
                  {% if box.github_stars %}
                    <span class="stars" data-toggle="tooltip" title="GitHub Stars">
                      <i class="fa-solid fa-star"></i>
                      <span id="{{ box.github_stars }}-stars"></span>
                    </span>
                  {% endif %}
                </div>
              {% endif %}
            </div>
          </div>
        </div>
      </div>
    </div>
  </a>
</div>
For the categorized items, create an if statement to differentiate between horizontal and default orientation. Create a for loop to display each individual item int the filtered, sorted variable. Remember to use the variable from the liquid file.
            {% if page.horizontal %}
                <div class="container">
                    <div class="row row-cols-1 row-cols-md-2">
                        {% for box in sorted_boxes %}
                            {% include boxes_horizontal.liquid %}
                        {% endfor %}
                    </div>
                </div>
            {% else %}
                <div class="row row-cols-1 row-cols-md-3">
                    {% for box in sorted_boxes %}
                        {% include boxes.liquid %}
                    {% endfor %}
                </div>
            {% endif %}
For the uncategorized items, recreate the sorted_collection pulling directly from the site.collection. Create the if statement to differentiate between horizontal and default orientation. Create a for loop to display each individual item int the filtered, sorted variable. Remember to use the variable from the liquid file. At this point, rerun the bundle exec command and check the new collection in the browswer.
        <!-- Display boxes without categories -->
        {% assign sorted_boxes = site.boxes | sort: "importance" %}
        <!-- Generate cards for each project -->
        {% if page.horizontal %}
            <div class="container">
                <div class="row row-cols-1 row-cols-md-2">
                    {% for box in sorted_boxes %}
                        {% include boxes_horizontal.liquid %}
                    {% endfor %}
                </div>
            </div>
        {% else %}
            <div class="row row-cols-1 row-cols-md-3">
                {% for box in sorted_boxes %}
                    {% include boxes.liquid %}
                {% endfor %}
            </div>
        {% endif %}
Update blog
Create a new item in the _posts folder. It follow the naming convention: yyyy-mm-dd-title.md.

---
layout: post
title: First post.
date: 2025-01-03 09:56:00-0400
description: A quick post about this new portfolio.
tags: portfolio
categories: personal
related_posts: false
---

<p>Welcome to my blog.  Feel free to check it out and let me know what you think.</p>
- layout: Indicates the layout of the file. Blog posts use post layout.
- title: The tile for the post.
- date: Follows the format: yyyy-mm-dd hh:mm:ss-0400
- description: The description that will appear under the header.
- tags: The hashtag tags associated with the post.
- category: The category of the post for grouping purposes.
In the _config.yml file, update the display_tags and display_categories to whatever was done in your posts.
display_tags: ["portfolio"] # these tags will be displayed on the front page of your blog
display_categories: ["personal"] # these categories will be displayed on the front page of your blog
In the same file, update the blog and the blog description.
blog_name: ScottiSec # blog_name will be displayed in your blog page
blog_description: My musings about the InfoSec/Cybersecurity space.
permalink: /blog/:year/:title/
lsi: false # produce an index for related posts
Also, delete all of the sample posts to clean up the blog. Also, also, comment out the external blog posts in the _config.yml file.
# External sources.
# If you have blog posts published on medium.com or other external sources,
# you can display them in your blog by adding a link to the RSS feed.
#external_sources:
#  - name: medium.com
#    rss_url: https://medium.com/@al-folio/feed
#  - name: Google Blog
#    posts:
#      - url: https://blog.google/technology/ai/google-gemini-update-flash-ai-assistant-io-2024/
#        published_date: 2024-05-14
Check the blog in the web browser to ensure it looks how you want it.

Deployment
Generate ssh keys with the email for your GitHub. Ensure that you enter a strong passphrase. If a key already exist in the current folder, give it a unique name.
ubz@ubz-VirtualBox:~/Documents/GitHub/biscottidiskette.github.io$ ssh-keygen -t ed25519 -C "<your_email_here>"

<snip>

Enter passphrase (empty for no passphrase):
Enter same passphrase again:
Switch the repository from using HTTPs to using SSH.
git remote -v
git remote set-url origin git@github.com:OWNER/REPOSITORY.git
git remote -v
Use cat to get the public key. Copy the public key.
cat <path_to_the_public_key>
Click on the avatar in the upper-right corner and click settings.

From the settings menu, navigate to the SSH and GPG keys.

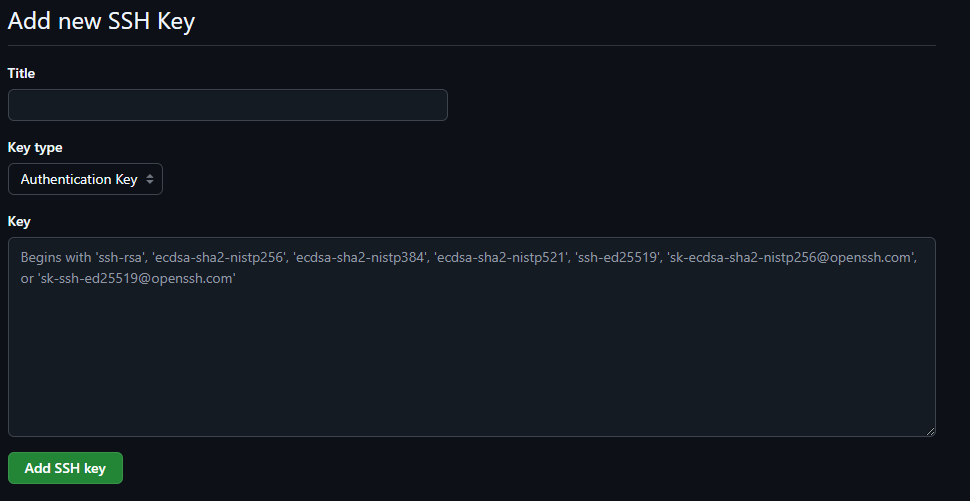
Click on New SSH key.

Give it a title. Choose a key type. And paste the public key into the box labeled key. Repeat that for the other key type. If prompted, confirm your access to GitHub.
Use the package manager to install npm and use npm to install purgecss.
sudo apt update
sudo apt install npm
sudo npm install -g purgecss
Navigate into the repo folder. Stage all of the changes and commit them.
git add .
git commit -m "<commit_comment_here>"
Deploy the code to the gh-pages branch. The deploy command output will let you know it was successful.
ubz@ubz-VirtualBox:~/Documents/GitHub/biscottidiskette.github.io$ bin/deploy --user

<snip>

Switched to branch 'main'
Your branch is up to date with 'origin/main'.
Deployed successfully!
From the repository settings, click on Pages.
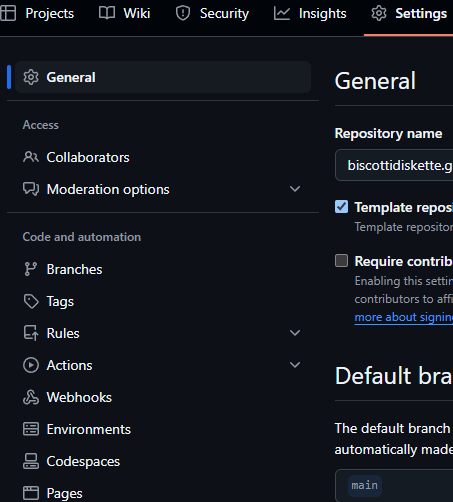
Ensure that the branch is the gh-pages branch.

Check the branch. On the right-hand side, you should see deployments. It will have a yellow circle if it is still deploying. It will have a green check if it is done.

Push the repo back into the main branch.
git push origin main
And with that, you should be good to go. If not, I will come back and edit this at some later date in time. Maybe.
References:
Adding a new SSH key to your GitHub account. (n.d.). Retrieved from https://docs.github.com/en/authentication/connecting-to-github-with-ssh/adding-a-new-ssh-key-to-your-github-account
derek. 2016, June 21. You don’t have write permissions for the /var/lib/gems/2.3.0 directory. stackoverflow. https://stackoverflow.com/questions/37720892/you-dont-have-write-permissions-for-the-var-lib-gems-2-3-0-directory
Generating a new SSH key and adding it to the ssh-agent. (n.d.). Retrieved from https://docs.github.com/en/authentication/connecting-to-github-with-ssh/generating-a-new-ssh-key-and-adding-it-to-the-ssh-agent
Managing remote repositories. (n.d.). Retrieved from https://docs.github.com/en/get-started/getting-started-with-git/managing-remote-repositories#switching-remote-urls-from-https-to-ssh
Spencer Pao. How To Build A Website | Github Pages | Jekyll | Template. YouTube. https://www.youtube.com/watch?v=g6AJ9qPPoyc
Techno Tim. Meet Jekyll - The Static Site Generator. YouTube. https://www.youtube.com/watch?v=F8iOU1ci19Q